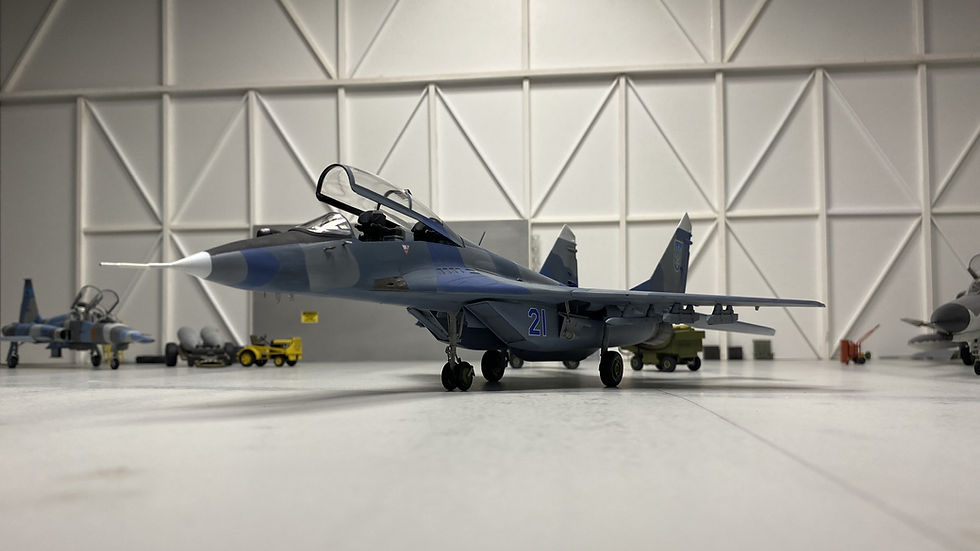
Ukraine Striker: 1/48th Academy MiG-29 UB
There are not many choices of MiG-29 kits in this scale and this is the only dual-seater kit that I have come across. While this kit has its issues the 1/48th Academy MiG-29 UB will get you a MiG-29 trainer that will look the part, if you don't study it too closely.
Notable Kit Features:
Decent instructions with some reference photos included
Basic cockpit and ejection seat
Choice of open or closed canopy
Optional open or closed dorsal intake louvers
Open or closed FOD doors in intakes
Compressor faces at end of intake ducts provided
Positionable speed brakes

Build Inspiration:
I had this 1/48th Academy MiG-29 UB kit in the stash for a while. I initially bought Academy's MiG-29A kit and later added this one to the "Pile of Potential". I was aware of the kit's short-comings however, when I came across this one at a local hobby shop the "on sale" price was enticing enough to jump in again. Looking for markings (other than the Russian option) I had found several nice finishes from the Slovak or German line-ups but then focused on a Ukraine MiG and finally found this beauty (The Ukraine digital camouflage ones seemed a bit too much work for this kit). This Ukraine MiG-29 UB was a rare scheme and is seen second-in-line at Ozerne Air Base circa 2006 in the above photo.

Heads-Up Report:
Poor parts fit in places, requiring sanding and filler
Cockpit and ejection seats are basic
Glue upper halves together then lower halves - do NOT glue upper and lower halves together until landing gear bays are installed (Instructions are a bit vague)
Nose fit requires sanding and filler (reported shape issue with nose as well)
Wheel wells are inaccurate and difficult to remedy
No intake trunks provided
Intake components are a poor fit requiring a lot of careful gluing up in stages followed by some filler and sanding to eliminate steps and seams
Intake halves had pin marks on the interior
Wing upper / lower half fit is okay at best - pre-join and post-join sanding required
Wings have heavy trailing edges
Poor fit of vertical tails
Undercarriage doors are the wrong shape and a poor fit
Starboard side tail mounted pitots are incorrectly placed in the instructions – these should be on the outer surface, not the inner surface
The large intake scoop on the upper rear fuselage is incorrect shape
Wingtip lights are also the wrong shape
So-so engine exhausts with heavy rear trailing edges
Centre tank forward mount required regrade to fit onto surface

Kit Additions / Modifications:
Replaced kit seat with aftermarket Metallic Details Ejection Seat K-36DM (MDR4807) Note: aftermarket seats will not fit into the shallow Academy cockpit without some surgery (Purchased from Kyiv retailer https://plastic-models-store.com/ )
Drilled out 4 lower fuselage drain holes around rear portion of engines
Replaced exhausts with resin set
Added weight to nose to counter weight of replacement burners
Used aftermarket decals from Foxbot (Purchased from Kyiv retailer https://plastic-models-store.com/ )

Finishing:
I found the paint scheme that I wanted to do on this aircraft during an Internet search on Ukraine Mig-29 UBs. The Blue & Grays camouflage would go well with the markings so, I figured out the most likely colours that were used which were determined to be close matches to FS35109 Dark Blue, FS36270 Dark Gray and FS35237 Gray Blue. I had some older (Flat acrylic XF-Series) Tamiya paints that I decided to use on this project. The problem probably developed when I thinned these paints (possibly a bit too much) to spray a former project, as what I got was a somewhat unstable colour (Especially on the gray blue which turned more greenish after drying) Thinning the paint tends to produce a lighter tone compared to the original colour with acrylic paints. The paint also ended up with a very weathered look to it as I was adding tones on the fly as I painted the colors to get some variation, plus the added odd Tamiya effects. The weathered look I liked as it matched the theme of the real aircraft, the colour shift, not so much. To make matters worse the tape I used seemed to react with the Tamiya paint and put an odd striation into the effect as well as gumming up the surface after removing the tape.

After some debate, I decided to "go with the flow" on the paint colours. I removed the tape residue and touched up a few topside spots. The underside gray was given an overspray of gray-blue highly mixed with white to shift it lighter and more blue, which worked out well. I found when I sprayed on the clear gloss it toned down the weathering a fair degree (now I was a bit disappointed that it did). A gloss coat also give you another small paint colour shift, so you have to be aware of this when trying to match a decal colour. (There are all kinds of challenges in this hobby!) I gathered the decals from a Foxbot decal sheet (Direct from Kyiv) and was off to get the markings applied, washes brushed on and wiped off and then top it off with a matte clear finish. Onwards to cement all the final fittings and antennas to have another kit finished and ready for The Hangar for 2026.

The After-Build Report:
Not many manufactures have taken on the MiG-29 series let alone the dual-seat version. If you want a MiG-29 UB this 1/48th Academy plastic will most likely be your starting point. (The Eduard kit is based on the Academy with extra parts supplied to enhance the kit.) The 1/48th Academy MiG-29 UB will get a reasonable looking kit to display, it will just take a bit more work (and best leave the scale drawings aside, which is fine with me).
Of the single-seater MiGs the very early Monogram MiG-29 kit was known for its (major) inaccuracies (it was based upon the prototype) so it is not really a contender. Many of the MiG-29A/B/C/S series kits are based off the Academy plastic (Eduard; Hobby2000; Kora; Wolfpack...) HobbyBoss and Great Wall Hobbies (GWH) are the only other MiG-29 available to my knowledge. The GWH kits are considered the best in class, however price points may lead you to consider another manufacturer that better suits your budget.

Feel free to comment or ask any questions - Keep on building, gain experience, challenge yourself if you like, but try not to stress yourself out over the build - it is supposed to be an enjoyable hobby after all - Cheers


Congratulations! Excellent result, and a solid departure from the decent, yet having issues, Academy kit.